
TIME SAVING
With our innovative products, you can save up to 70 percent of your working time compared to conventional electrical installation methods.
Because your time is valuable!

WORK EASIER
Our clever installation materials make your work on the construction site easier and even eliminate unnecessary work steps completely.
This way, each of your jobs becomes your favorite project!

MULTIPLE APPLICATION
Our well-thought-out product range with practical multiple uses helps you counteract the shortage of skilled workers and minimize your storage costs.
One product for the entire construction site!
THERMO BOX SYSTEM FROM PRIMO
All advantages at a glance!
THE FASTEST FLUSH-MOUNTING SYSTEM IN THE WORLD
The Primo flush-mounting boxes are installed just in a few seconds with the specially developed Thermo Foam. Laborious plastering as with conventional products is no longer necessary. The highlight: In combination with the foam, the Thermo Box enables an airtight and thermal bridge-free installation including sound insulation.
Futhermore, with the SCS connection technology, several Thermo Boxes can be lined up and firmly connected – ideal for fast through-wiring or the installation of pre-wired devices. In addition, thanks to the in-house Cable Plopp technology, cables can now be inserted completely without tools. Convince yourself of the “Fastest Flush-Mounting System In The World”.
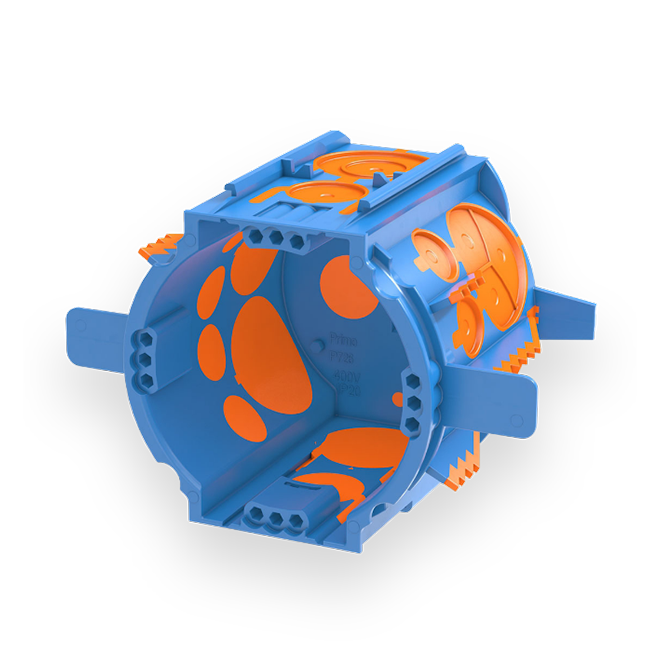
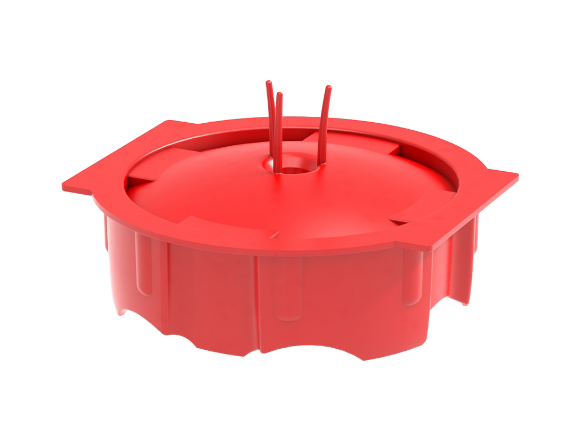
Thermo Box THD-70
Depth 68 mm, installation opening 60 mm, width (with plaster stop) 105 mm
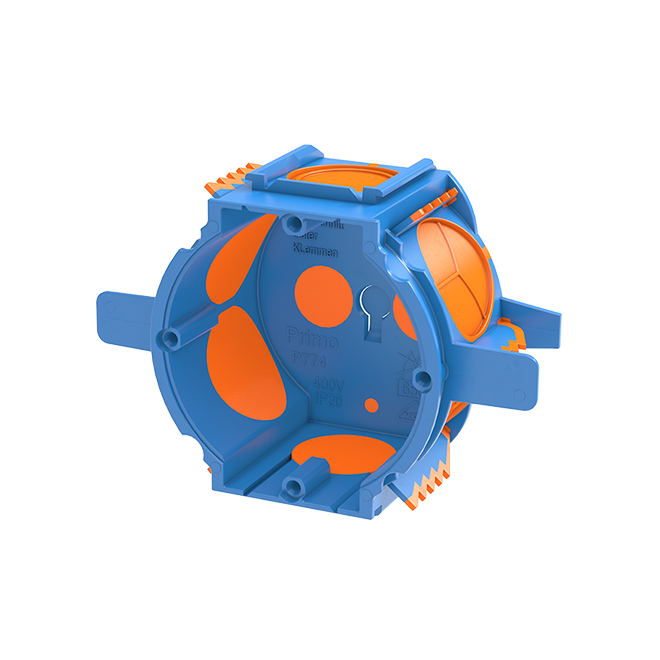
Thermo Box THD-45
Depth 46 mm, installation opening 60 mm, width (with plaster stop) 105 mm
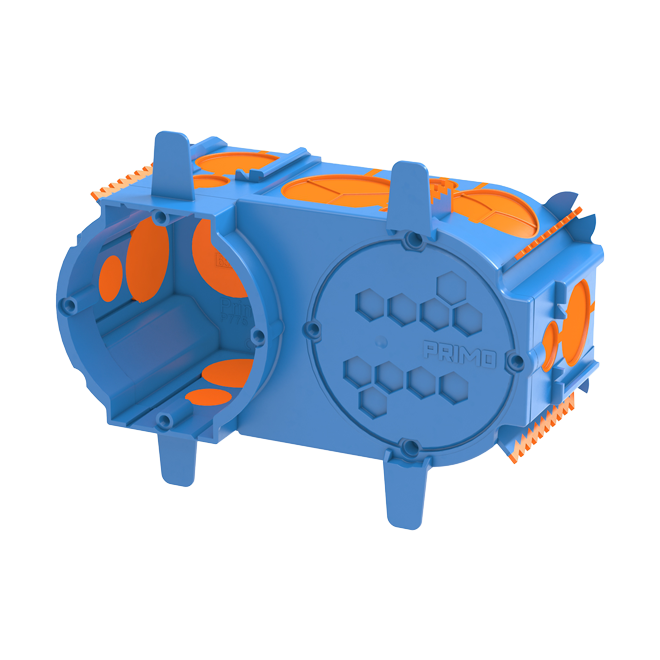
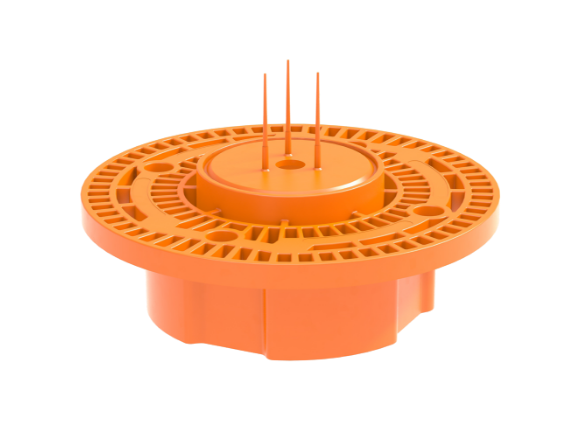
Thermo Box TED-70
depth 68 mm, installation opening 60 mm or 2x 60 mm, width (with plaster stop) 105 mm
")
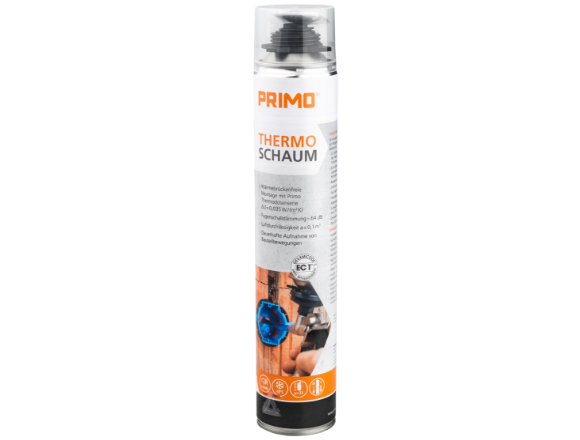
Thermo Foam
As versatile as your projects
With the specially developed Thermo Foam and Thermo Foam ECO the Thermo Box can be securely mounted in any masonry in seconds. A small squirt of foam through the predetermined breaking point at the back of the box is enough to completely enclose it. In addition to quick installation, the foam also enables a thermal bridge-free and airtight installation of the flush-mounting box, including sound insulation.
Downloads:
Easy assembly
in just a few steps
1
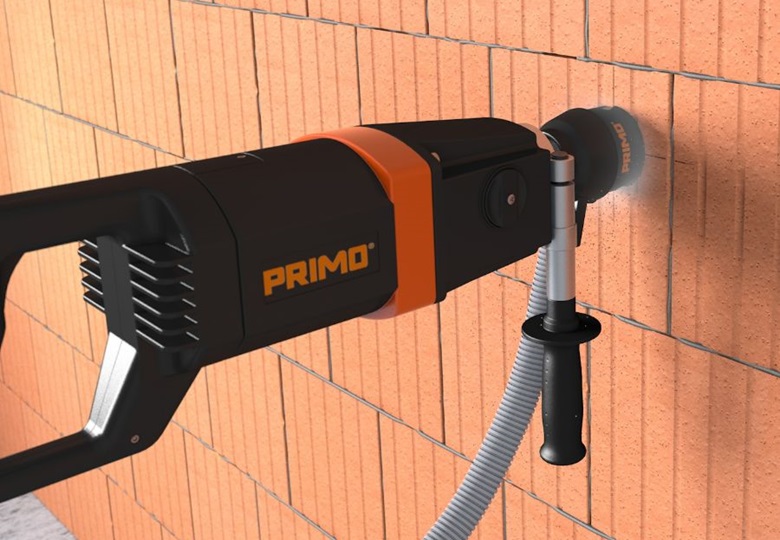
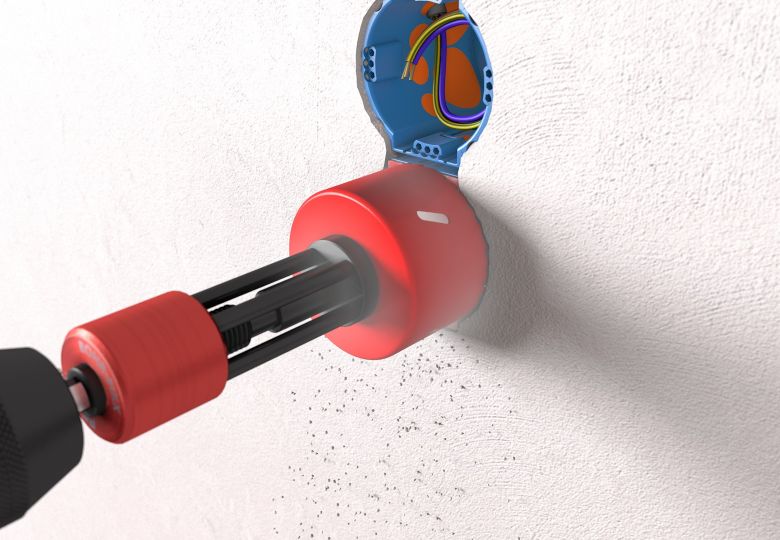
Mark the first box and drill with the Primo High Speed Driller a 82 mm hole.
2
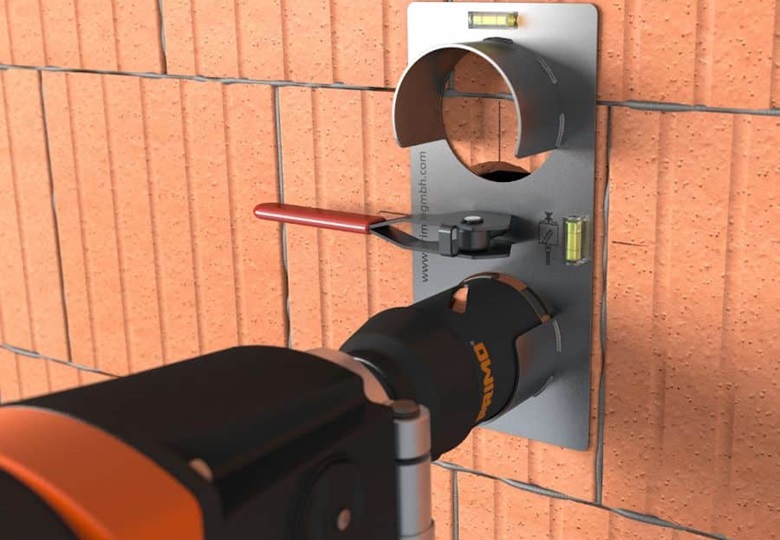
For multiple combinations, insert the Drilling Template into the first hole. Tighten the lever and align it using the integrated spirit level. Drill more holes with standardized comination spacing of 71 mm by moving the Drilling Template.
3
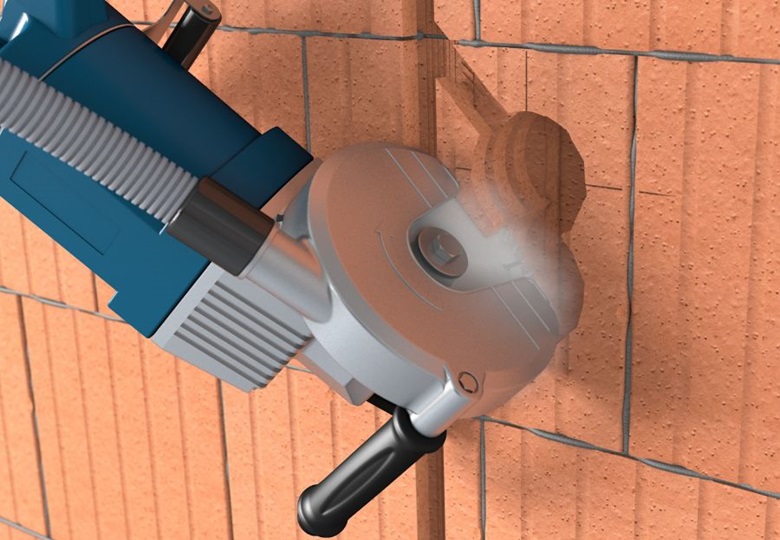
Mill a slot with the brickwork groove milling machine along the drill holes and into the box holes. Pay attention to the installation zone!
4

Moisten the hole so that the foam swells even better.
5
Insert the boxes up to the plaster stop. This guarantees standard-compliant and plaster-flush installation.
6
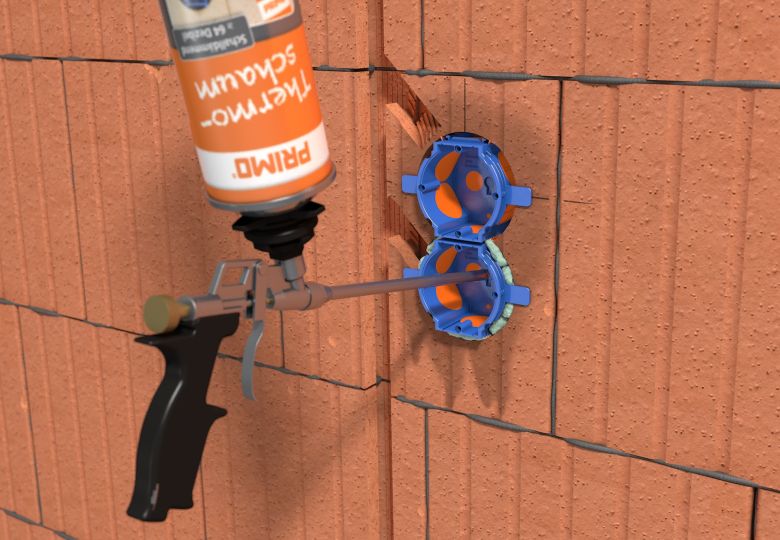
Use the Foam Pistol to break out the predetermined breaking point in the rear of the box and inject the Thermo Foam until the box is completely enclosed, airtight and thermal bridge-free.
7
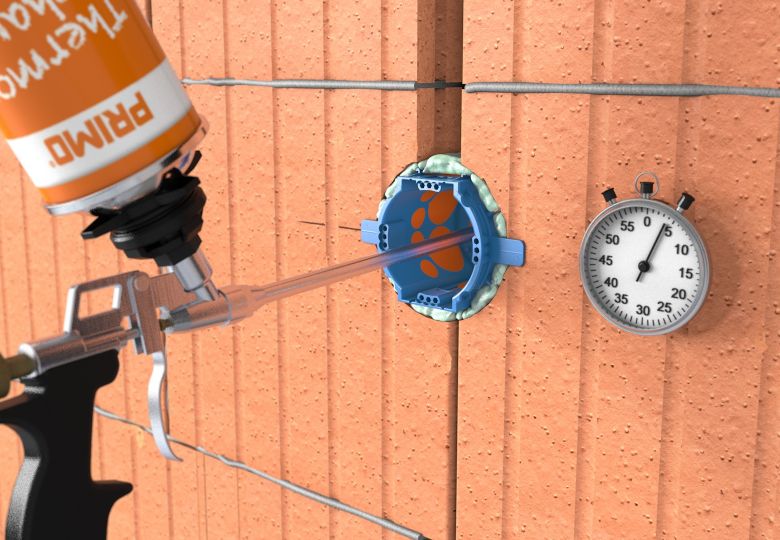
After 20-30 minutes the foam is cut-resistant.
8

Push the cables through the Cable Plopp to insert them absolutely tool-free.
9
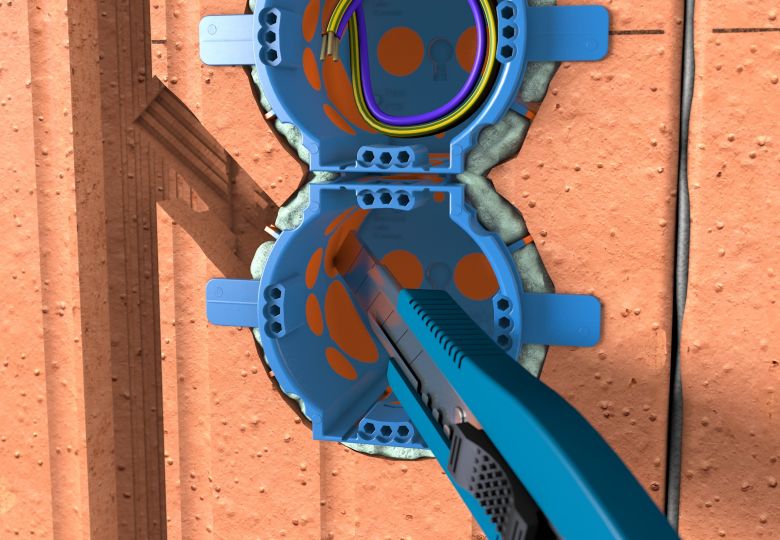
Alternatively, open the membrane with the cutter knife…
10
…and insert the conduits.
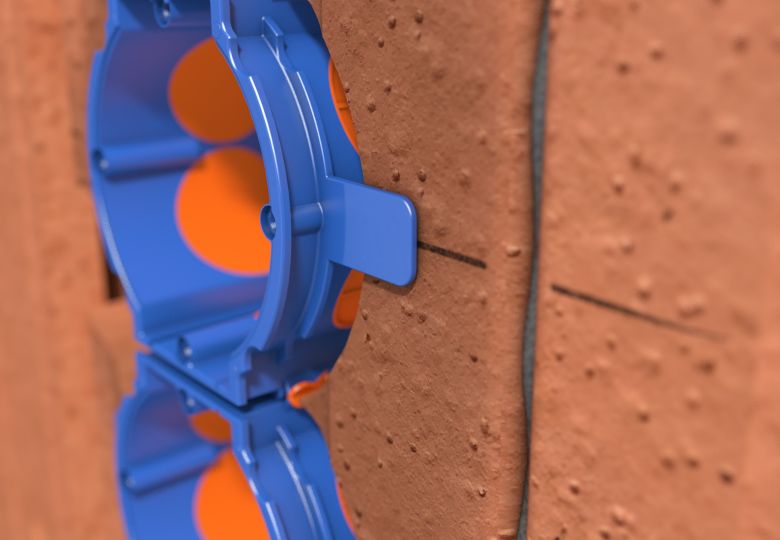
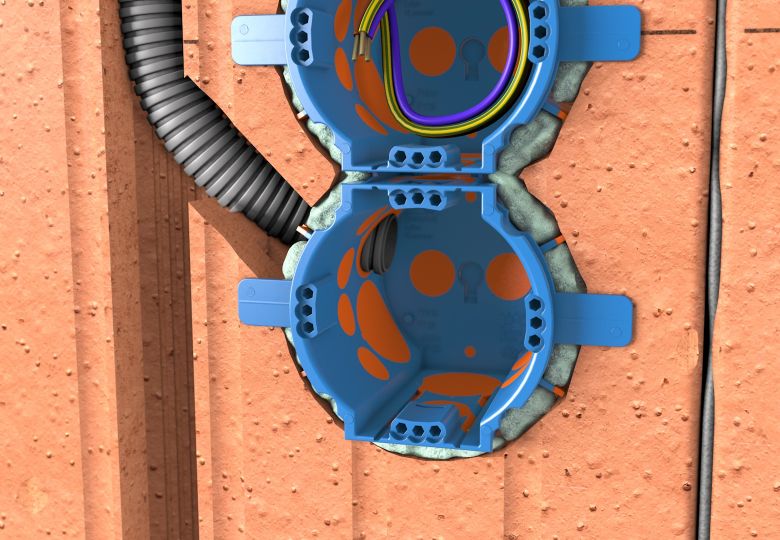
11
Thanks to the membrane teeth, the box is already fixed in the hole before foaming. In this way, already piped boxes can also be mounted and only then be foamed.
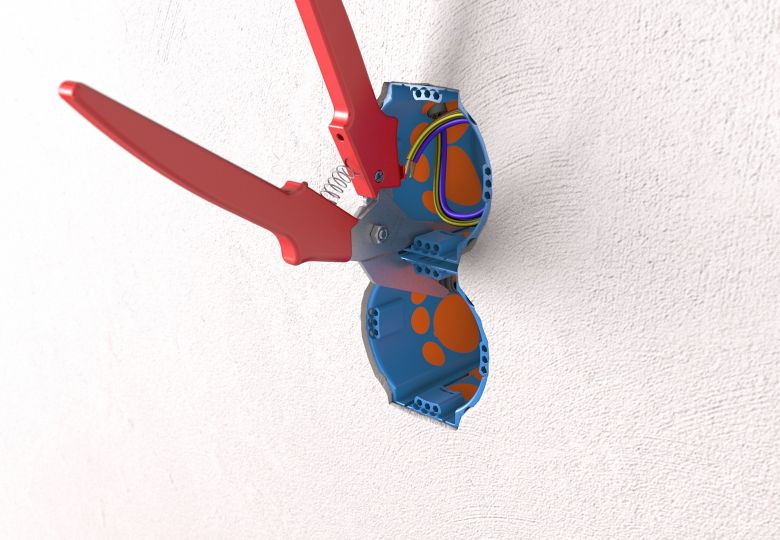
12

Attach the convex Signal Cover to the 61 mm opening of the box to protect the screw bosses and the inside of the box, as well as to reduce the plaster application.
13

The signal pins help you to find the box quickly. Push in the Signal Cover with your finger or a screwdriver. When it pops outwards, a clean contour is created without offsets in the plaster. Then remove the Signal Cover.
14
Alternatively, expose the Signal Cover with a 68 mm holesaw and remove it at the same time.
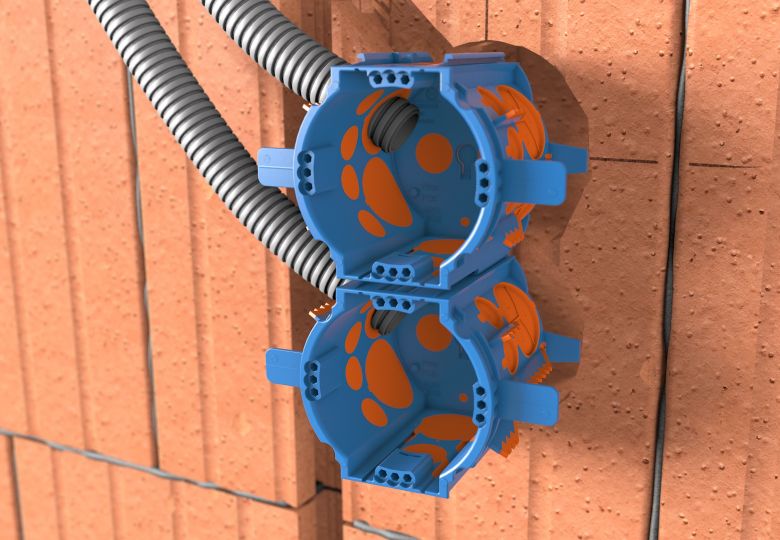
15
For multiple connections, remove the web between the SCS rails.
16
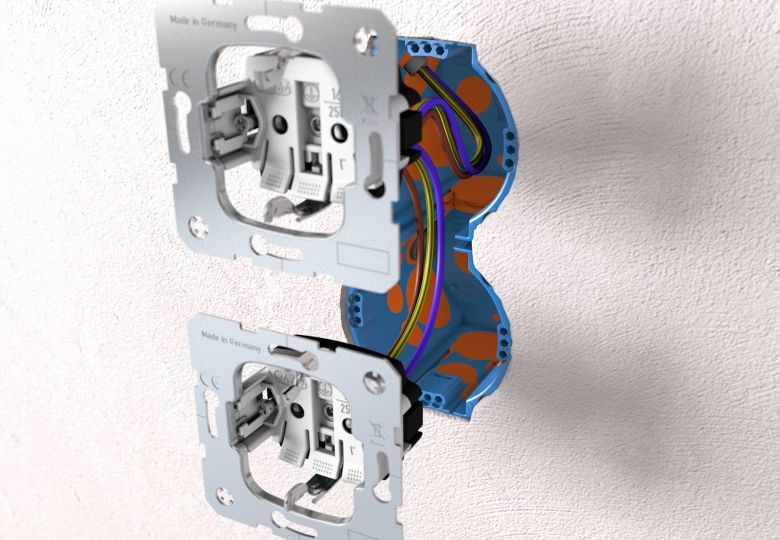
Once the web is cut through, wire electronic components in the large installation space or directly insert pre-wired devices.
17
Flexible alignment of the devices thanks to three screw bosses.
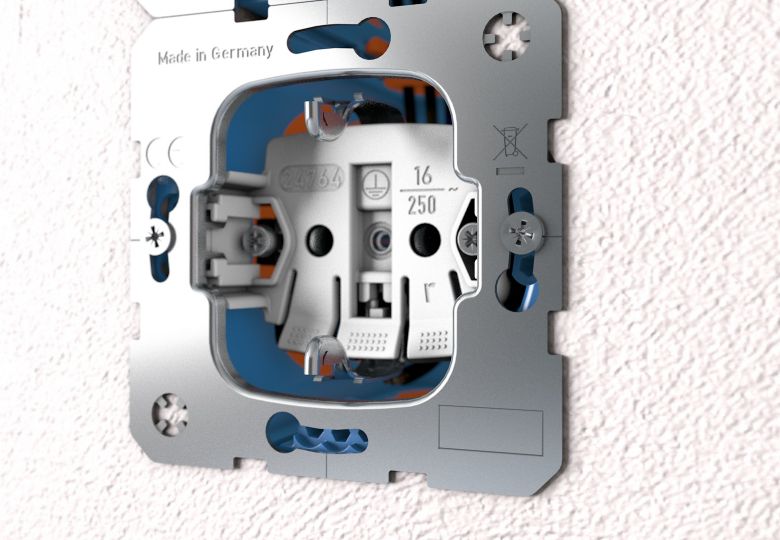
18
Complete the installation!
Accessories for the fastest flush-mounting system in the world
Signal Cover
Equipment Carrier
Thermo Foam
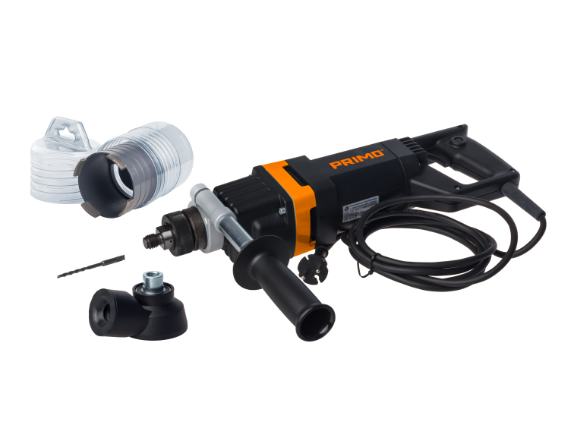
High Speed Driller Set

Drilling Template
YOU MIGHT ALSO BE INTERESTED IN:
Further flush-mounting solutions

How many boxes does one bottle of Thermo Foam last for?
One bottle of Thermo Foam is sufficient for approximately 100 boxes. For bricks, it’s sufficient for approximately 70 boxes, for Ytong, sand-lime brick and concrete, it’s sufficient for approximately 120 boxes.
How much foam is needed for one box?
The box only needs to be foamed 1/3 full, as the foam expands.
Why does the Thermo Box cost more than the standard flush-mounting box?
Our boxes aren’t just standard boxes; they can do a lot more! The Thermo Boxes are installed with Thermo Foam in just a few seconds. There’s no need for time-consuming plastering or mortaring as required with conventional products. The highlight: In combination with the Thermo Foam, the Thermo Boxes enable an airtight, thermal-bridge-free installation, including sound insulation.
In addition, the SCS Connection Technology allows multiple boxes to be lined up and to be securely connected. The connecting bar can then be easily removed for quick through-wiring or the installation of pre-wired devices. Furthermore, thanks to the Cable Pop, cables can be inserted completely without tools. All this makes the Primo Thermo Box system the fastest flush-mounting system in the world, saving you up to 70% of installation time for each individual Thermo Box.
On top, only one type of box is required for the entire flush-mounting installation. This saves storage costs and can also counteract the shortage of skilled workers, as there’s no risk of confusion during installation.
Can the Thermo Box be used in the external thermal insulation composite system (ETICS)?
Yes, the Thermo Box can be used in the external thermal insulation composite system (ETICS). It can be used in the following masonry:
- Poroton / Brick
- Ytong
- Sand-lime brick
- Solid wood
- Concrete
- Pumice
- EPS (Styrofoam)
- XPS (Styrodur)
- PU insulation boards
- Wood fiber insulation
- Wood chip cladding stone
Can the Thermo Box system be used in old buildings?
The Thermo Box system is ideal for installation in older buildings. Thanks to its membrane locking teeth, the Thermo Box can be secured anywhere, even when significant material has already been removed. For flush installation on already plastered walls, simply break off the plaster stop and insert the box completely.
Which box can be used if it is unclear what material is behind the walls?
The Thermo Box is always the right choice because it holds in any material.
It can be used in the following masonry:
- Poroton / Brick
- Ytong
- Sand-lime brick
- Solid wood
- Concrete
- Pumice
- EPS (Styrofoam)
- XPS (Styrodur)
- PU insulation boards
- Wood fiber insulation
- Wood chip cladding stone
Are there plaster leveling rings?
The integrated plaster stop of the Thermo Box ensures flush installation according to DIN standards. If necessary, all conventional leveling rings fit the Thermo Boxes.
How can slots be milled after foaming without damaging the box?
Thanks to the membrane locking teeth, the Thermo Boxes stay firmly in the drilled hole as soon as they’re inserted – even without foam. This allows the boxes to be installed pre-wired/pre-piped. For multiple combinations, the SCS Connection Technology provides additional stability, the connecting bar can be quickly and easily removed if necessary.
This means you can first drill the hole with the High Speed Driller and then mill the slots directly before inserting the Thermo Box and foaming it. This eliminates the risk of damaging the boxes. Furthermore, this method saves you up to 70 percent of your working time.
Why is installation with Thermo Foam better than with plaster?
Our Thermo Box system is VDE-certified and suitable for thermal bridge-free installation. Good to know: Gypsum is not permitted in exterior walls or damp rooms due to the risk of mold growth.
Our Thermo Foam is suitable for all applications. The Thermo Foam meets DGNB quality levels 1 and 2. The Thermo Foam ECO meets DGNB quality levels 3 and 4. This enables sustainable construction methods in accordance with KfW funding programs.
What advantages does the Primo Thermo Electronics Box offer over standard electronics boxes?
The Primo Thermo Electronics Box eliminates time-consuming plastering, it’s easily installed in seconds using Thermo Foam. The box offers ample space for network cables, KNX systems, and other fieldbuses for building automation. Additionally, the second opening can be easily opened, creating multiple combinations at the standardized spacing of 71 mm. Furthermore, the Primo Thermo Electronics Box can also be used as a soundproofing box.
How do you achieve the required precise drilling for the Thermo Boxes?
We have just the right accessory for this: our Drilling Template. This drilling guide allows you to mill boxes with a standard hole spacing of 71 mm in line. It is attached with the quick-clamping function and aligned using integrated spirit levels. This allows you to create multiple combinations with just one measurement.
Does working with the Drilling Template take longer?
The major advantage of using the Drilling Template is that you only need to mark the hole once. There’s no need to adjust the box later. Our High Speed Driller is the perfect accessory for this. It enables faster and cleaner drilling. This reduces damage to the wall. Even in (filled) exterior walls, it prevents large-scale breakage of the drill hole and the resulting significant damage. The boxes can be installed more precisely, and material consumption is reduced.
Does the Drilling Template have to be used to use the Thermo Box system?
No, but the Drilling Template is a practical tool that helps you save a lot of time while achieving a high-quality result. The Drilling Template ensures precise and clean drill holes. However, you can also install the Thermo Boxes without the Drilling Template.
What do I do if my High Speed Driller is broken?
Please fill out our Repair Order for High Speed Drillers.
Do you have any questions about our products or do you see yourself as the next Primo Team-Player? Then contact us!


“Thanks to the innovative Primo systems, we’ve achieved significant time savings. In times of skilled labor shortages, this is one of the most important factors. If you don’t have people on site, you should at least save time at work.”